
Landscaping
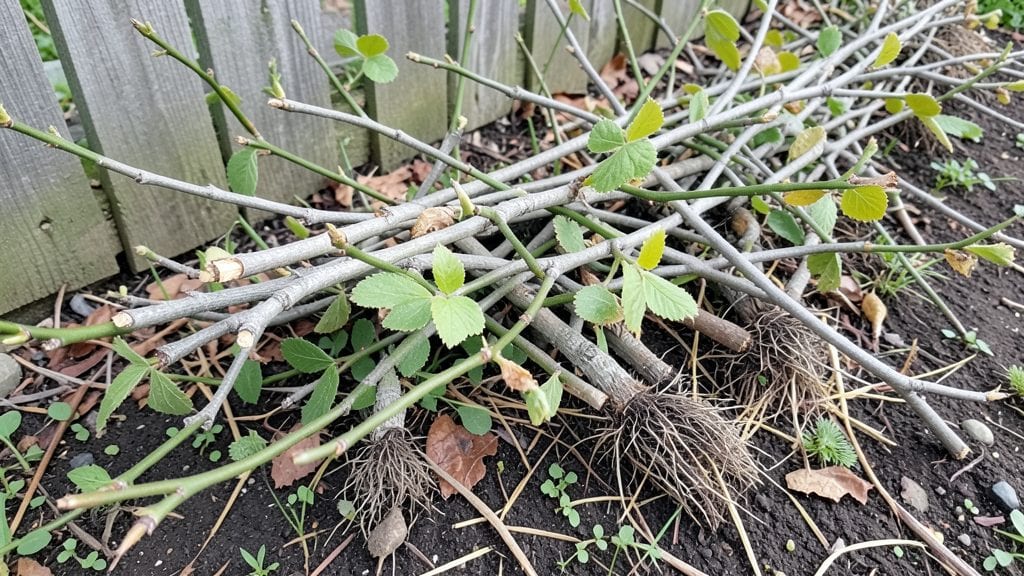
Willow garden edging transforms sharp lines into flowing, natural borders that feel like they belong in the wild. 🌿 I planted mine last spring, and within months, the soft, arching branches created a living screen that no plastic or stone could match.
The best part? It grows with your garden, adapting to its shape over time.
You’ll need fast-growing varieties like weeping willow or pussy willow, which thrive in moist soil and partial sun. Space them 18–24 inches apart for a dense, lush barrier, and plant in early spring when roots establish easily.
This isn’t just decoration—it controls erosion, muffles noise, and adds privacy without blocking light.
By summer, you’ll have a velvety green curtain that sways in the breeze, softening edges and inviting wildlife. Pruning just once a year keeps it tidy, and the roots strengthen soil while the branches filter sunlight beautifully. It’s the kind of border that makes neighbors ask, “What’s that magic?”
Works for everything from cottage gardens to modern landscapes—just adjust spacing for taller or shorter varieties. Here’s how to make it happen without the guesswork.
📚 In This Guide
- What you need
- Instructions
- Tips and common mistakes
- Wrapping up and next steps
What you need
- ● Willow whips or cuttings: 10–20 flexible, 3–5 ft long branches (preferably from weeping willow, Salix babylonica, or similar species). Choose fresh, green shoots for best rooting success.
- ● Bamboo stakes or plant supports: 6–10 stakes (1–2 ft tall) to anchor your willow edging securely.
- ● Garden twine or zip ties: For temporarily securing willow branches to stakes while they root.
- ● Compost or potting mix: 2–3 bags (or enough to fill a 6–8 inch deep trench along your edging line). Opt for well-draining, nutrient-rich soil.
- ○ Mulch (optional but recommended): Straw, wood chips, or shredded bark to retain moisture and suppress weeds.
- ● Shovel or spade: For digging trenches (6–8 inches deep and 4–6 inches wide).
- ● Garden shears or pruners: To trim willow branches to your desired length and shape.
- ● Measuring tape: To mark and maintain consistent spacing (typically 12–18 inches apart for willow stakes).
- ● Gloves: Heavy-duty work gloves to protect your hands from thorns or rough branches.
- ● Watering can or hose with a gentle spray nozzle: For keeping willow cuttings hydrated during rooting.
- ○ Staple gun (optional): If you prefer permanently securing willow branches to stakes with landscape staples.
- ● Sunlight access: Choose a location with partial to full sun (willows thrive in moist, sunny spots).
- ● Water source nearby: Willow edging requires consistent moisture, especially during the first few weeks.
- ● Clear edging line: Mark your desired border with spray paint or a garden hose to visualize the layout.
- ● Time commitment: Willow edging takes 4–6 weeks to root and establish—plan accordingly!
Step-by-Step instructions for planting willow garden edging
Here’s how to create a lush, natural border that grows with your garden.
🌱 Step 1: Choose and Prepare the Planting Site
Willow edging thrives in moist, well-drained soil with partial sun to full shade. Pick a trench about 6 inches deep and 12 inches wide—this gives roots room to spread without competing with nearby plants. If your soil drains poorly, mix in 2 inches of coarse sand along the bottom to improve airflow.
Mark the trench with stakes and string for a straight line, or let it meander naturally for a softer look. I always test moisture by digging a small hole—if water pools after 10 minutes, your site is too wet for willows. In that case, plant on a slight slope or raise the bed with extra soil.
🪴 Step 2: Plant Willow Whips at the Right Spacing
Willow whips (young, flexible stems) should go in 12–18 inches apart for a dense hedge or 24 inches apart if you want airy movement. Dig a hole just deep enough to bury half the whip’s length—any deeper and roots will rot. Gently loosen the roots before placing the whip in the hole to encourage spreading.
Press soil firmly around the base but don’t compact it—willows need loose soil to establish quickly. Water deeply right after planting to settle the soil and remove the stake once the whip stands upright on its own. This step is critical: skipping it leads to weak, leaning plants that flop over in wind or rain.
💧 Step 3: Water and Mulch for Strong Growth
Keep the soil consistently moist but not soggy for the first 4–6 weeks—willows establish roots faster in damp conditions. Water 2–3 times per week unless rain does the job, aiming for 1 gallon per plant each time. You’ll know you’re doing it right when the soil feels damp 2 inches down after watering.
Spread 2 inches of mulch (like wood chips or straw) around each plant, keeping it 3 inches away from the stem to prevent rot. Mulch locks in moisture and keeps roots cool in summer. I avoid thick layers—too much mulch suffocates the soil and slows growth.
✂️ Step 4: Prune and Maintain for a Neat Border
Trim back any leggy growth in early spring before new shoots appear. Cut just above a leaf node (the bump where leaves attach) to encourage bushier growth. For a formal edge, shear the tops evenly with hedge shears—willows grow fast, so prune every 6–8 weeks during the growing season to keep them tidy.
Fertilize lightly in early spring with a balanced 10-10-10 formula (just 1 tablespoon per plant). Too much fertilizer makes willows grow too fast, weakening their structure. Watch for yellow leaves—they usually mean the soil is too wet or nutrient-heavy. Adjust watering or mulch instead of adding more food.
☀️ Step 5: Enjoy Your Living Border
Once established, willow edging needs minimal care—just occasional trims and watering during dry spells. In 3–5 years, your border will grow dense enough to block weeds naturally. For a taller hedge, plant whips 18 inches apart and prune annually. For a wild, natural look, let them grow freely—they’ll sway beautifully in breezes.
Here’s the thing—willows spread over time, so plant a barrier root (like a buried plastic sheet) if you don’t want them encroaching on lawns or paths. Otherwise, embrace their wanderlust—they’re the ultimate low-maintenance, eco-friendly border.
Tips & tricks for perfect willow garden edging
These little details make all the difference between a thriving living border and one that struggles.
Soil Test Matters: That 10-minute water test in Step 1 is your best friend. If water pools after 10 minutes, your soil is too wet—willows hate soggy roots. I’ve seen people plant in these conditions and end up with yellow, weak plants. Instead, raise the bed slightly or create a slope to improve drainage before planting. The goal is moist but never waterlogged soil.
Root Loosening Technique: In Step 2, when loosening those willow whip roots, don’t just pull them apart—gently spread them outward in the hole. This encourages wider root spread right from planting. I learned this the hard way after seeing whips grow straight down instead of outward, creating weak plants that toppled in wind. A quick 30-second root fluffing makes all the difference.
Mulch Placement Precision: The 2 inches of mulch in Step 3 should stay 3 inches away from the stem—this prevents rot while keeping roots cool. I’ve seen people pile mulch right against the stem, which creates the perfect environment for fungal growth. Use a rake to create a small circle around each plant, then fill it with mulch. This simple adjustment keeps your willows healthy for years.
Pruning Timing Secret: That early spring prune in Step 4 isn’t just about looks—it’s about growth signals. When you cut just above a leaf node, you’re telling the plant "grow bushier here." I’ve noticed willows pruned this way develop thicker growth within just 4-6 weeks. Avoid late-season pruning—new growth won’t harden off before winter, leaving your plants vulnerable to frost damage.
Pro Tips for Willow Garden Edging
- These little details make all the difference between a thriving living border and one that struggles.
- Soil Test Matters: That 10-minute water test in Step 1 is your best friend.
- Root Loosening Technique: In Step 2, when loosening those willow whip roots, don’t just pull them apart—gently spread them outward in the hole.
Frequently asked questions
about willow garden edging—here’s what you need to know before planting!What’s the best time of year to plant willow garden edging?
Plant willow cuttings in early spring (just as new growth begins) or late fall (before the first frost). Avoid summer—heat stress slows rooting. For container-grown willows, you can plant year-round in mild climates, but spring/fall still offer the best success rates.
How often should I water willow edging?
Keep soil consistently moist (not soggy) for the first 6–12 months to encourage root growth. After establishment, willows tolerate drought but may flop without regular watering. Mulch around the base to retain moisture and suppress weeds.
Can I trim willow garden edging to control its height?
Yes! Trim back leggy or overgrown stems in early spring before new growth starts. Use clean pruners to cut just above a leaf node. Avoid heavy pruning in fall—it can stimulate tender new growth that won’t survive winter. Aim for a 3–4 foot height for tidy borders.
Are there alternatives to willow for garden edging?
Try bamboo (fast-growing but invasive), ornamental grasses (like pampas grass), boxwood hedges (slow-growing, formal), or ivy (climbing option). For a living edge, Russian olive or dogwood are also great low-maintenance choices.
Why are my willow cuttings dying or turning brown?
Brown tips or wilting often signal underwatering, root rot (from overwatering), or pests (like aphids). Check soil moisture, ensure good drainage, and inspect leaves for pests. If roots look mushy, repot or trim affected areas. Fungal issues? Apply neem oil or copper fungicide.
Wrapping up and next steps
Transforming your garden with willow garden edging isn’t just about aesthetics—it’s about creating a serene, low-maintenance border that evolves with your space. Whether you’re drawn to its natural beauty, eco-friendly appeal, or the joy of nurturing living plants, willow edging offers a timeless solution for any landscape.
Ready to take the next step? Start small with a single section, monitor its growth, and soon, your garden will be framed in lush, swaying greenery that feels like a hug from nature. 🌿✨