Tools
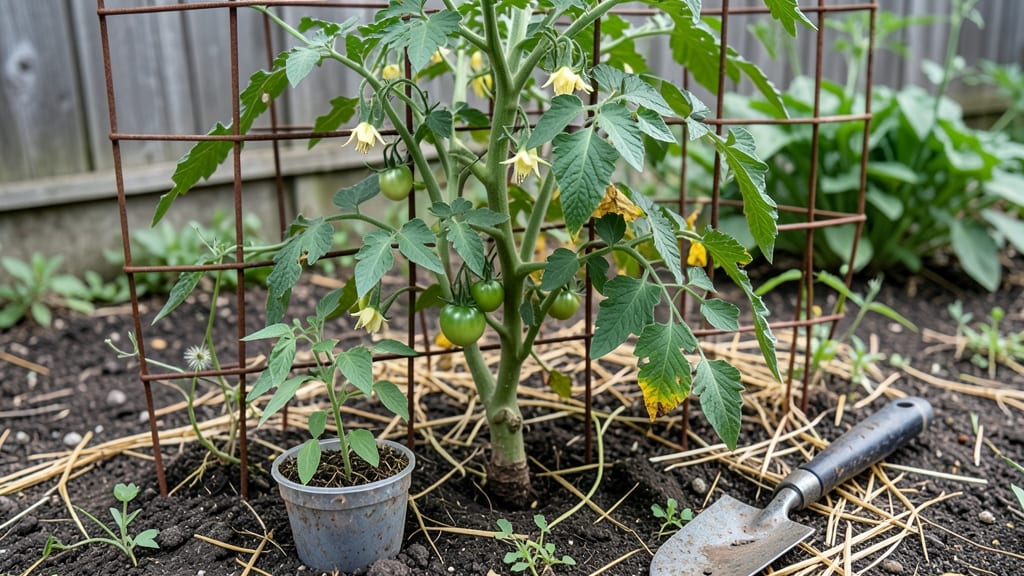
My caged vegetable garden isn’t just a way to grow food—it’s a privacy screen that doubles as a harvest. 🌱 I built mine last spring after realizing my backyard fence left me feeling exposed, and now it’s the most productive (and stylish) part of my yard.
The key is choosing the right crops and arranging them so they support each other—literally and figuratively.
You’ll need sturdy cages or trellises (I use powder-coated metal for durability), climbing plants like pole beans or cucumbers, and bushier companions like tomatoes or peppers at the base. The layout should follow the sun’s path, with taller plants on the north side to avoid shading smaller ones.
This setup saves space, deters pests, and makes harvesting a breeze—no more bending over all season.
By mid-summer, you’ll have a lush green wall that blocks nosy neighbors while producing more than you can eat. The scent of ripe tomatoes and the sight of vines heavy with zucchini make it hard to believe it’s the same space that once felt bare.
Plus, the vertical growth keeps weeds down and makes watering efficient. It’s gardening with a view—and a harvest.
Works for small balconies or large backyards, and you can adjust the height based on your privacy needs. Whether you’re hiding from prying eyes or just maximizing your plot, this method turns gardening into a multi-purpose masterpiece. Let’s get those cages planted!
📚 In This Guide
- What you need
- Instructions
- Tips and common mistakes
- Wrapping up and next steps
What you need
- ● Metal or wooden cage frame: Pre-made cages (e.g., 4’x4’x4’ or custom sizes) or materials to build your own (e.g., 1/2” galvanized steel tubing, 2”x2” wooden posts, or PVC pipes).
- ● Hardware: Galvanized screws or bolts (3”–4” long, 10–20 pieces depending on size).
- ● Heavy-duty zip ties (50+ for securing netting or privacy panels).
- ● Privacy/protection: Bamboo rolls or wooden lattice panels (for aesthetic privacy).
- ● Frost cloth or agricultural netting (for wind/weather protection; 10’x10’ roll for a 4’x4’ cage).
- ● Garden fabric: Landscape fabric (5’x10’ roll) to suppress weeds.
- ● Soil & amendments: High-quality potting mix or compost (2–3 cubic feet per plant).
- ● Slow-release fertilizer (e.g., 10-10-10 or organic options).
- ● Drip irrigation kit (for hands-free watering).
- ● Trellis wire (to train vining plants like cucumbers or beans).
- ● Solar-powered LED lights (for evening ambiance or deterring pests).
- ● Decorative plants (e.g., ivy or ornamental grasses) to soften the cage’s look.
- ● Portable potting bench (if prepping soil or seedlings indoors).
Step-by-Step instructions for building a caged vegetable garden
Here's how I transform a simple metal cage into a year-round privacy screen that also feeds my family.
🪴 Step 1: Choose and Prepare the Garden Cage
Start with a sturdy 6-foot tall metal garden cage designed for vegetables. I always select one with a 3-foot diameter base—big enough for 4-6 plants but not so wide it becomes unwieldy. Before assembling, inspect the frame for sharp edges and sand them down gently with 120-grit sandpaper to prevent snagging leaves or fabric.
Assemble the cage according to the manufacturer's instructions, but don't rush—take your time to ensure all joints are secure. The goal is a frame that won't wobble when you lean against it later. Once assembled, place the cage in its final location. You'll want it positioned where it gets at least 6 hours of sunlight daily—most south or west-facing spots work best.
🌱 Step 2: Plant Your Vegetable Foundation
Fill the cage with 3 cubic feet of premium potting mix mixed with 1 cup of compost. I press the soil down lightly to create a firm planting bed, but not so compacted that roots can't penetrate easily. The cage's depth should comfortably accommodate 18-inch tall plants at maturity, so I plant my tallest varieties—like tomatoes or peppers—first.
Plant your 4-6 vegetable starts (depending on variety) by digging holes just deep enough to bury the root balls completely. Space them evenly around the cage's perimeter, leaving 12 inches between each plant. Water immediately after planting to help settle the soil and eliminate air pockets around the roots. This ensures the plants establish quickly and start growing toward the cage's edges.
💧 Step 3: Attach Privacy Fabric and Secure Edges
Cut a piece of heavy-duty privacy fabric to match the cage's height and width. I use a 6-foot tall by 3-foot wide panel that drapes over the entire front of the cage. Secure the top edge of the fabric to the cage's top rail using zip ties, pulling it taut but not so tight that it distorts the fabric. The goal is to create a smooth, unbroken surface that will support climbing plants later.
For the bottom edge, I fold the fabric over the cage's base and tuck it under the soil line. This keeps the fabric in place while allowing water to drain properly. If you're concerned about wind, add a second row of zip ties about halfway up the cage to prevent flapping. The fabric should now create a solid, vertical backdrop for your vegetables to grow against.
🌿 Step 4: Train Plants to Climb and Fill the Cage
As your vegetables grow, gently weave their stems through the privacy fabric's mesh. I start this process when plants reach 12 inches tall, using soft plant ties to secure them to the fabric without damaging the stems. For indeterminate varieties like tomatoes or pole beans, this encourages vertical growth and maximizes space. Even bush varieties like peppers or basil will grow upward along the fabric if guided properly.
Water consistently to keep the soil evenly moist, but avoid overwatering—the cage's fabric will trap some humidity, so you'll want to check the soil's moisture level by sticking your finger 1 inch deep. If it feels dry, water thoroughly until moisture reaches 6 inches down. Within 6-8 weeks, your cage should transform from a bare frame into a lush, living privacy screen.
✂️ Step 5: Maintain Growth and Harvest Strategically
Regularly prune any leggy growth that extends beyond the cage's fabric to maintain a neat appearance. I also pinch off any suckers on tomato plants to direct energy upward. When harvesting, always cut fruits from the vine rather than pulling them—this prevents damaging the plant's structure. I find that harvesting in the morning gives me the freshest produce and encourages the plant to produce more.
By mid-summer, your cage should be completely filled with foliage and fruit, creating a dense, natural privacy barrier. The beauty of this system is that it doubles as both a functional garden and a decorative screen. Just keep an eye out for pests and treat them promptly—healthy plants are your best defense against infestations.
Tips & tricks for perfect caged vegetable gardens
These practical tips will help you maximize your garden cage's potential and avoid common pitfalls that can turn your project into a frustrating experience.
Location is Everything: While the instructions mention needing at least 6 hours of sunlight, I've found that morning sun (east-facing) actually works better for many vegetables. The cooler morning light reduces stress on plants, especially in hot climates. If you must place it west-facing, consider adding shade cloth during peak afternoon hours to prevent wilting.
Soil Preparation Secret: The 3 cubic feet of potting mix should be mixed with compost BEFORE adding it to the cage. This ensures even distribution of nutrients throughout the planting bed. I also recommend adding a handful of perlite to improve drainage—this prevents root rot in the contained space. Don't compact the soil too much in Step 2, or you'll create air pockets that stunt root growth.
Fabric Installation Technique: When attaching the privacy fabric in Step 3, I suggest using a staple gun instead of zip ties for the top edge. Staples provide a more secure hold that won't loosen over time, especially important if you live in a windy area. For the bottom edge, create a small trench around the cage's perimeter to bury the fabric edge completely—this prevents wind from lifting it and creates a cleaner look.
Plant Selection Strategy: In Step 2, consider planting fast-growing varieties like bush beans or radishes in the center of the cage. These will fill in gaps while your main plants establish. For the 12-inch spacing between plants, measure from the center of each plant's root ball—not the edge—to ensure proper air circulation. This prevents fungal diseases that thrive in crowded conditions.
Pro Tips for Caged Vegetable Garden
- These practical tips will help you maximize your garden cage's potential and avoid common pitfalls that can turn your project into a frustrating experience.
- Location is Everything: While the instructions mention needing at least 6 hours of sunlight, I've found that morning sun (east-facing) actually works better for many vegetables.
- Soil Preparation Secret: The 3 cubic feet of potting mix should be mixed with compost BEFORE adding it to the cage.
Frequently asked questions
Got questions about caged vegetable gardens?
You’re not alone! Here are answers to the most common queries to help you grow with confidence—whether you're a beginner or a seasoned gardener.
What’s the best time of year to install a caged vegetable garden?
A caged garden can be installed year-round, but timing depends on your climate. In mild zones (USDA 7-10), plant in early spring or late summer to avoid extreme heat. In colder regions (USDA 3-6), wait until after the last frost (typically late April–May) or use cold-hardy crops like kale or spinach in early spring. Pro tip: Start with fast-growing greens (like lettuce) to test soil and drainage before planting heavier crops.
Can I use a caged garden for vegetables other than tomatoes?
While cages are classic for tomatoes, peppers, and eggplants, they’re also great for:
- Cucumbers (use a larger cage or trellis)
- Green beans (pole varieties thrive vertically)
- Squash or zucchini (if pruned to control sprawl)
- Herbs like basil or mint (smaller cages work)
How do I keep pests out of my caged garden?
Cages alone won’t stop pests, but these tricks help:
- Row covers (lightweight fabric) for early-season bugs.
- Neem oil or soapy water spray for aphids/mites.
- Beneficial insects like ladybugs or lacewings.
- Copper tape around the cage base deters slugs.
Are caged gardens worth the cost compared to other supports?
Cost depends on your setup:
Option
Pros
Cons
Pre-made cages ($10–$30)
Convenient, sturdy, reusable.
Limited customization.
DIY cages (wire/mesh, $5–$15)
Cheaper, adjustable height.
Time-consuming to build.
Trellises/bamboo stakes ($3–$10)
Budget-friendly, flexible.
Less stable in wind/heavy plants.
Can I overwinter a caged garden in cold climates?
Yes! With these steps:
- Choose cold-hardy crops (e.g., cabbage, carrots, or overwintering onions).
- Add mulch (straw or leaves) to insulate roots.
- Use a cloche or cold frame for extra protection.
- Prune dead foliage in late winter to prevent rot.
Wrapping up and next steps
A caged vegetable garden isn’t just a clever hack—it’s a game-changer for urban gardeners, busy families, and privacy seekers! 🌱 With year-round protection from pests, wind, and prying eyes, you’ll enjoy fresh, homegrown veggies without the hassle. Plus, it’s a stylish way to blend function with form.
Ready to dive in? Start small—pick a sunny spot, gather your materials, and build your first cage. Before you know it, you’ll be harvesting tomatoes, peppers, or herbs while keeping your garden exclusively yours. Happy growing! 🌿